It was actually funny when it happened to me. I just can’t seem to find the way to insert post in WordPress via coding. I looked into Google, here and there, support forums, you know all the desperations.
Not knowing anything about it, I then went to see the log(debug.log) file of WordPress and found this:
register_post_type was called <strong>incorrectly</strong>. Post type names must be between 1 and 20 characters in length. Please see <a href="https://wordpress.org/support/article/debugging-in-wordpress/">Debugging in WordPress</a> for more information. (This message was added in version 4.2.0.) in /app/public/wp-includes/functions.php on line 5167
Well folks, the answer was right there, the post_type name should not exceed 20 chars in length 🙂
This is an old article and might not work in the newer version. Please see the updated article here.
Many of you including me, must at least once have come upon this cumbersome task – To change the LearnPress Lesson Template. Where are my headers, menus and Footers? And as a loyal Google users, we’ve search adding every related words, search every forums to this task only to be frustrated and exhausted. No help from lord Google
And so I decided to take it all by myself. And finally, was able change this stubborn LearnPress lesson template. So here below the procedure I followed or simply say how I’d overcome this task. Hope some of you might benefit from this.
CAVEAT – If you know basic PhP, WordPress and HTML and CSS then only proceed with caution. What have worked in my case, might not work in your case.
And then versions WordPres Version: 5.2.2 LearnPress Version: 3.2.5.6
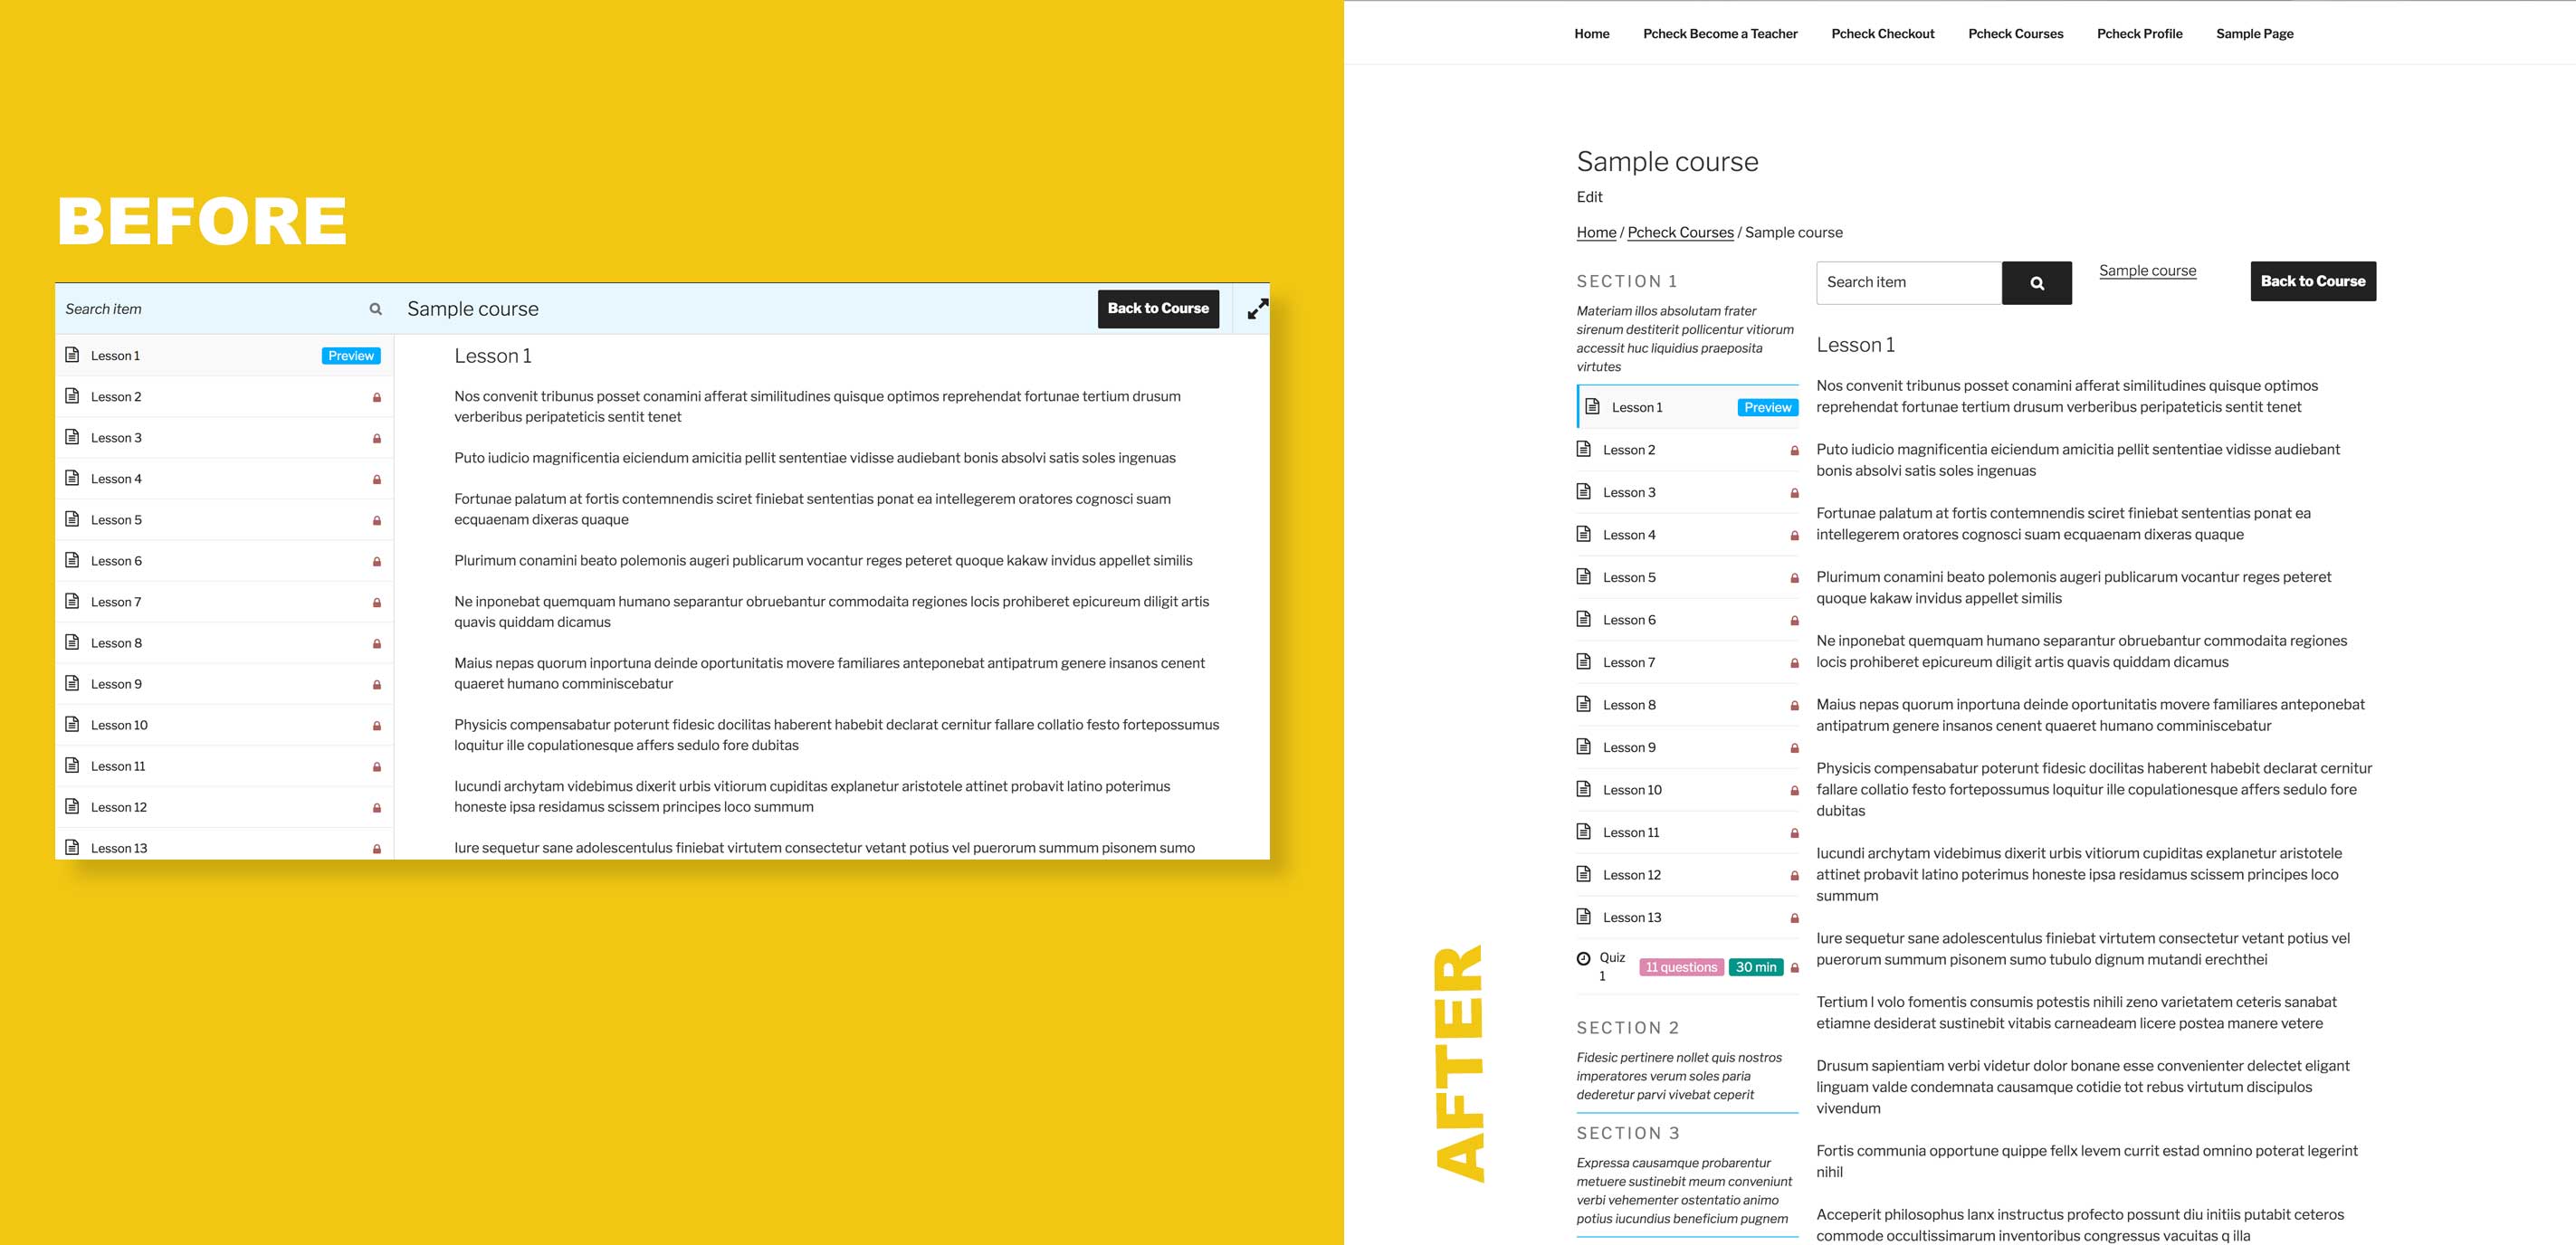
Here below is the default template design of the LearnPress where both header and footer are hidden by the lesson list and its content.
Now, Let’s find which file in LearnPress plugins are responsible for this lesson template from top to bottom.
plugins/learnpress/templates/content-single-item.php – is the main lesson template plugins/learnpress/templates/single-course/content-item.php – holds lesson’s content and lesson header plugins/learnpress/templates/single-course/content-item/header.php – holds the top search form plugins/learnpress/templates/single-course/tabs/curriculum.php – holds curriculum left lists
Behind The Scene
They have done it by targeting ID of the elements and making them fixed and absolute position. So first let’s change the “id” of the elements so that they could not target with their js/css code. To do so, we have to copy the individual files in our theme file, creating a directory called “learnpress”. If you see at the top of each file, they are suggesting and in their own words.
This template can be overridden by copying it to yourtheme/learnpress/content-single-course.php
File #1 – plugins/learnpress/templates/content-single-item.php – is the main lesson template Nothing to do here and not going into details here, but this below code is responsible for loading the contents (left lists, search header and lesson content)
<div id="learn-press-content-item"> to <div id="learn-press-content-item-custom">
<div class="content-item-scrollable"> to <div class="content-item-scrollable-custom">
Here we just changed the “id” adding “-custom” so that LearnPress js/css would not apply to this div
File #3 – plugins/learnpress/templates/single-course/content-item/header.php – holds the top search form
<div id="course-item-content-header"> to <div id="course-item-content-header-custom">
<div class="content-item-scrollable"> to <div class="content-item-scrollable-custom">
Here also, added “-custom” so their js/css would not apply. Note if you look at the top of this file, they are suggesting to put this file in learnpress/single-course/header.php but actually it should be learnpress/single-course/content-item/header.php
File #4 – plugins/learnpress/templates/single-course/tabs/curriculum.php – holds curriculum left lists
<div class="course-curriculum" id="learn-press-course-curriculum"> to <div class="course-curriculum" id="learn-press-course-curriculum-custom">
At this point, your page will be broken in terms of css but hold on. The good part comes later. Let’s add some styles.
/** * learnpress lesson custom css * * Important but you can change it as per your design */
html,
body {
    overflow: unset !important;
}

div#learn-press-course {
    display: flex;
    margin-left: -20px;
}

div#learn-press-course-curriculum-custom,
#learn-press-content-item-custom {
    margin-left: 20px;
}

div#learn-press-course-curriculum-custom {
    flex-basis: 35%;
}

#learn-press-content-item-custom div#course-item-content-header-custom {
    display: flex;
    justify-content: space-between;
    margin-bottom: 30px;
}

/* * Not Important * * Some inner content design but you should be fine now adding whatever you want in your design */
#course-item-content-header-custom .course-item-search form {
    display: flex;
}

#course-item-content-header-custom .course-item-search button:after {
    font-family: fontawesome;
    content: "\f002";
}

#course-item-content-header-custom .course-title {
    margin: 0;
    padding: 0;
    font-size: 1em;
}
After all above changes, you should get the following design, where you will have all your header and footer same as other pages in your site and the lessons as the content within the page. Of course, for twentyseventeen theme I had to bump the content width with css.
Hence, good luck, this is just the tip of the iceberg. I know, if you had to change this design, then, probably you must have whole other level of changes to be done but yeah my part is done here and your’s has just started.
P.S. A twentyseventeen theme, Com on, Give me real world example. You might say, so for you my friend here is the screenshot below of Eduma Theme I had to work on. Gotcha!
Final note: Most themes using LearnPress will add additional styles based on the “id” so after changing the “id” you have to add design again by yourself. Just copy and paste the related css comparing before design and put them in your css file. I had to redesign some of the elements like headings, icons, ul, li, font-size, line-height to make same as original theme design. So please be aware of that before you make changes.
Hi folks, I ran into a situation where I had to add the Reset button in Gravity Form that I’ve been using in the site as per the mockup. Turns out that here is no default option to add this “Reset” button. So on my quest for this, doodling around documentation As explain here: https://docs.gravityforms.com/gform_submit_button/
All you have to do is put this line of code in your functions.php file
You can also target the specific Gravity form by specifying/adding ID in the shortcode itself. In this case “2”
// Adding a reset button to Gravity form
add_filter( 'gform_submit_button_2', 'form_submit_button', 10, 2 );
function form_submit_button( $button, $form ) {
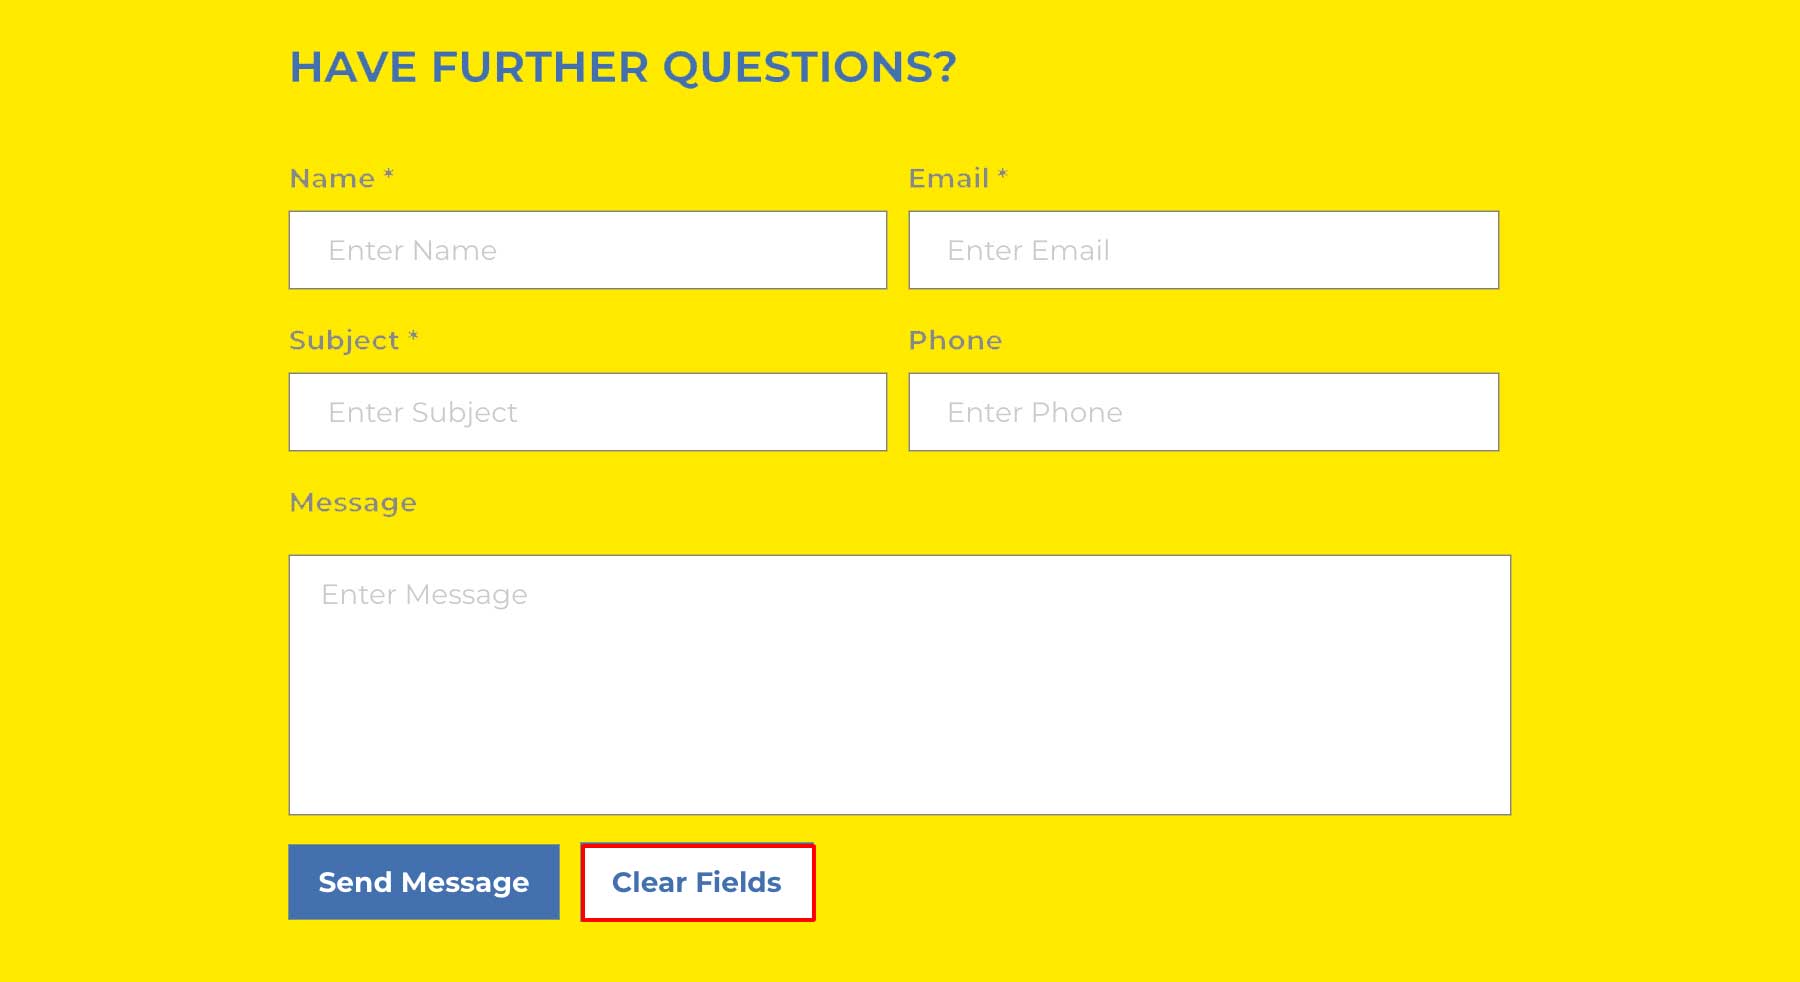
$button .= '<input type="reset" value="Clear Fields">';
return $button;
}
Of course do some styling. Here is my form after adding reset button. Take care.
Ok first, I would like to focus on the spelling. Well, I only used it because the locals there pronounce it with the “h” sound.
Now let’s start. It is very hard to get off the vtime and hit the offroad/trekking and this happens very rarely. But this past April I was lucky enough to have 10days of spare time. Without thinking of too much, I grabbed my pack and hit the road with Mahesh Dai.
So our main focus was to trip around RARA lake without busting the bank. You may do that as well if you like. So we started off from Gongabu Buspark to Surkhet. Tldr;) here is your version of itinerary.
Took us 16hrs to reach Surkhet with all the problems that tags along with travel. We were quite in time to take another bus to Taalcha from there but we denied and decided to go the next day. First got them tickets just to make sure we don’t waste the another day too. You got to have them because very few buses, two maybe, goes to Taalcha a day. Else you have to reserve the jeep that will cost you around Rs 50,000 – a one way ticket.
The next, day we got onto our bus to Taalcha and hit the road again. The road distance/time – you can say it is greater than Kathmandu to Surkhet, due to winding and harsh road condition. Karnali river flows widely along the road giving and taking everything she wants. We rested our night in Naagma, which just happened to be the hometown of our bus driver. Ahh, that was why he was so eager and driving fast eventhough it was night time and the road was bumpy. It was a fine night where our trip schedule was about to be changed. Coz we met with the local dai’s, returning home in the same bus with us. They told us their childhood path that included more walk than our initial route.
Early in Gothijuala(meaning: a place with paddy fields), we full-proofed our plan and left the bus. Our new route walk (Gothijula, Dopa, Chakpade, Majghatta to Rara – 12hrs of walk though the local claim it to be 6hrs at most, you know them and their 5mins right?). We had to home stay in the Chakpade, it was quite of a stay. We will never forget that night, full of awkwardness and long silence, followed by full of awkwardness and long silence. I will not forget the aalu khaja too, no never.
Reaching Rara was the great moment of our life both physically and mentally. We won the walk and pleased our eye at the same time. Everybody knows how beautiful is Rara. No need to mention, do I? We stayed there two more days, the first day after reaching Rara – we went to the Rara View Tower (5hrs walk) and on second day we round the Rara in full circle. So, in short, we saw and observe Rara in every possible way, how great is that? We met many others. I was shocked about – how many people were there, it was much much more than what I had expected. According to the hotel staff, it was less and they have seen more around 2100 people at the same time. Good gosh.
On fourth day in Rara, we of-course unwillingly have to leave Rara. We walk down to Taalcha airport which was 3 hrs walk down from Rara. We missed the plane being late for 15mins. Another home stay in Taalcha. Then the next day, we took a plane from Taalcha to Nepalgunj and from there bus ride back to Kathmandu.
Note: Do not take Ncell sim with you, the moment we left Surkhet to Taalcha till we arrived in Nepalgunj, the SIM was down, whole freaking 9days at least. I suggest take NTC simcard while you’re out of town, seriously.
Our Itinerary
Day 1: Kalanki to Surkhet Busfare: Rs 2640(2 seats)
Day 2: Surkhet Stay
Day 3: Surkhet to Taalcha Busfare: Rs 3200(2 seats) Naagma stay
Day 4: Naagma to Gothijuala Walk started from Gothijual, Dopa to Chakpade home stay
Day 5: Continue walk from Chakpade, Majghatta, Murma to RARA itself
Day 6: View tower walk
Day 7: Circled around Rara, did boating
Day 8: Leave Rara to Taalcha Taalcha Home Stay Hotel Expenditure: 10, 000 but lost 2000 somewhere
Day 9: Flight to Nepalgunj Plane Fare: Rs 9000(2 seats)
Day 10: Arrived in Kathmandu Bus Fare: Rs 2500
Ahmm…, lets talk about the money: Beside above major expenses + extra curriculum expenses we finished our trip costing around Rs 42,000 in total for two wanderers. But it was a worthy trip and I will definitely return one day, we both will do.
Now go on, get your shit together and hit the road because there are many things i left to write and some things, they had to be seen or experienced by you, yourselves. Note: Go on April for good weather condition, For snowfall, go after Dashain.