This is an old article and might not work in the newer version. Please see the updated article here.
Many of you including me, must at least once have come upon this cumbersome task – To change the LearnPress Lesson Template. Where are my headers, menus and Footers?
And as a loyal Google users, we’ve search adding every related words, search every forums to this task only to be frustrated and exhausted. No help from lord Google
And so I decided to take it all by myself. And finally, was able change this stubborn LearnPress lesson template. So here below the procedure I followed or simply say how I’d overcome this task.
Hope some of you might benefit from this.
And then versions
WordPres Version: 5.2.2
LearnPress Version: 3.2.5.6
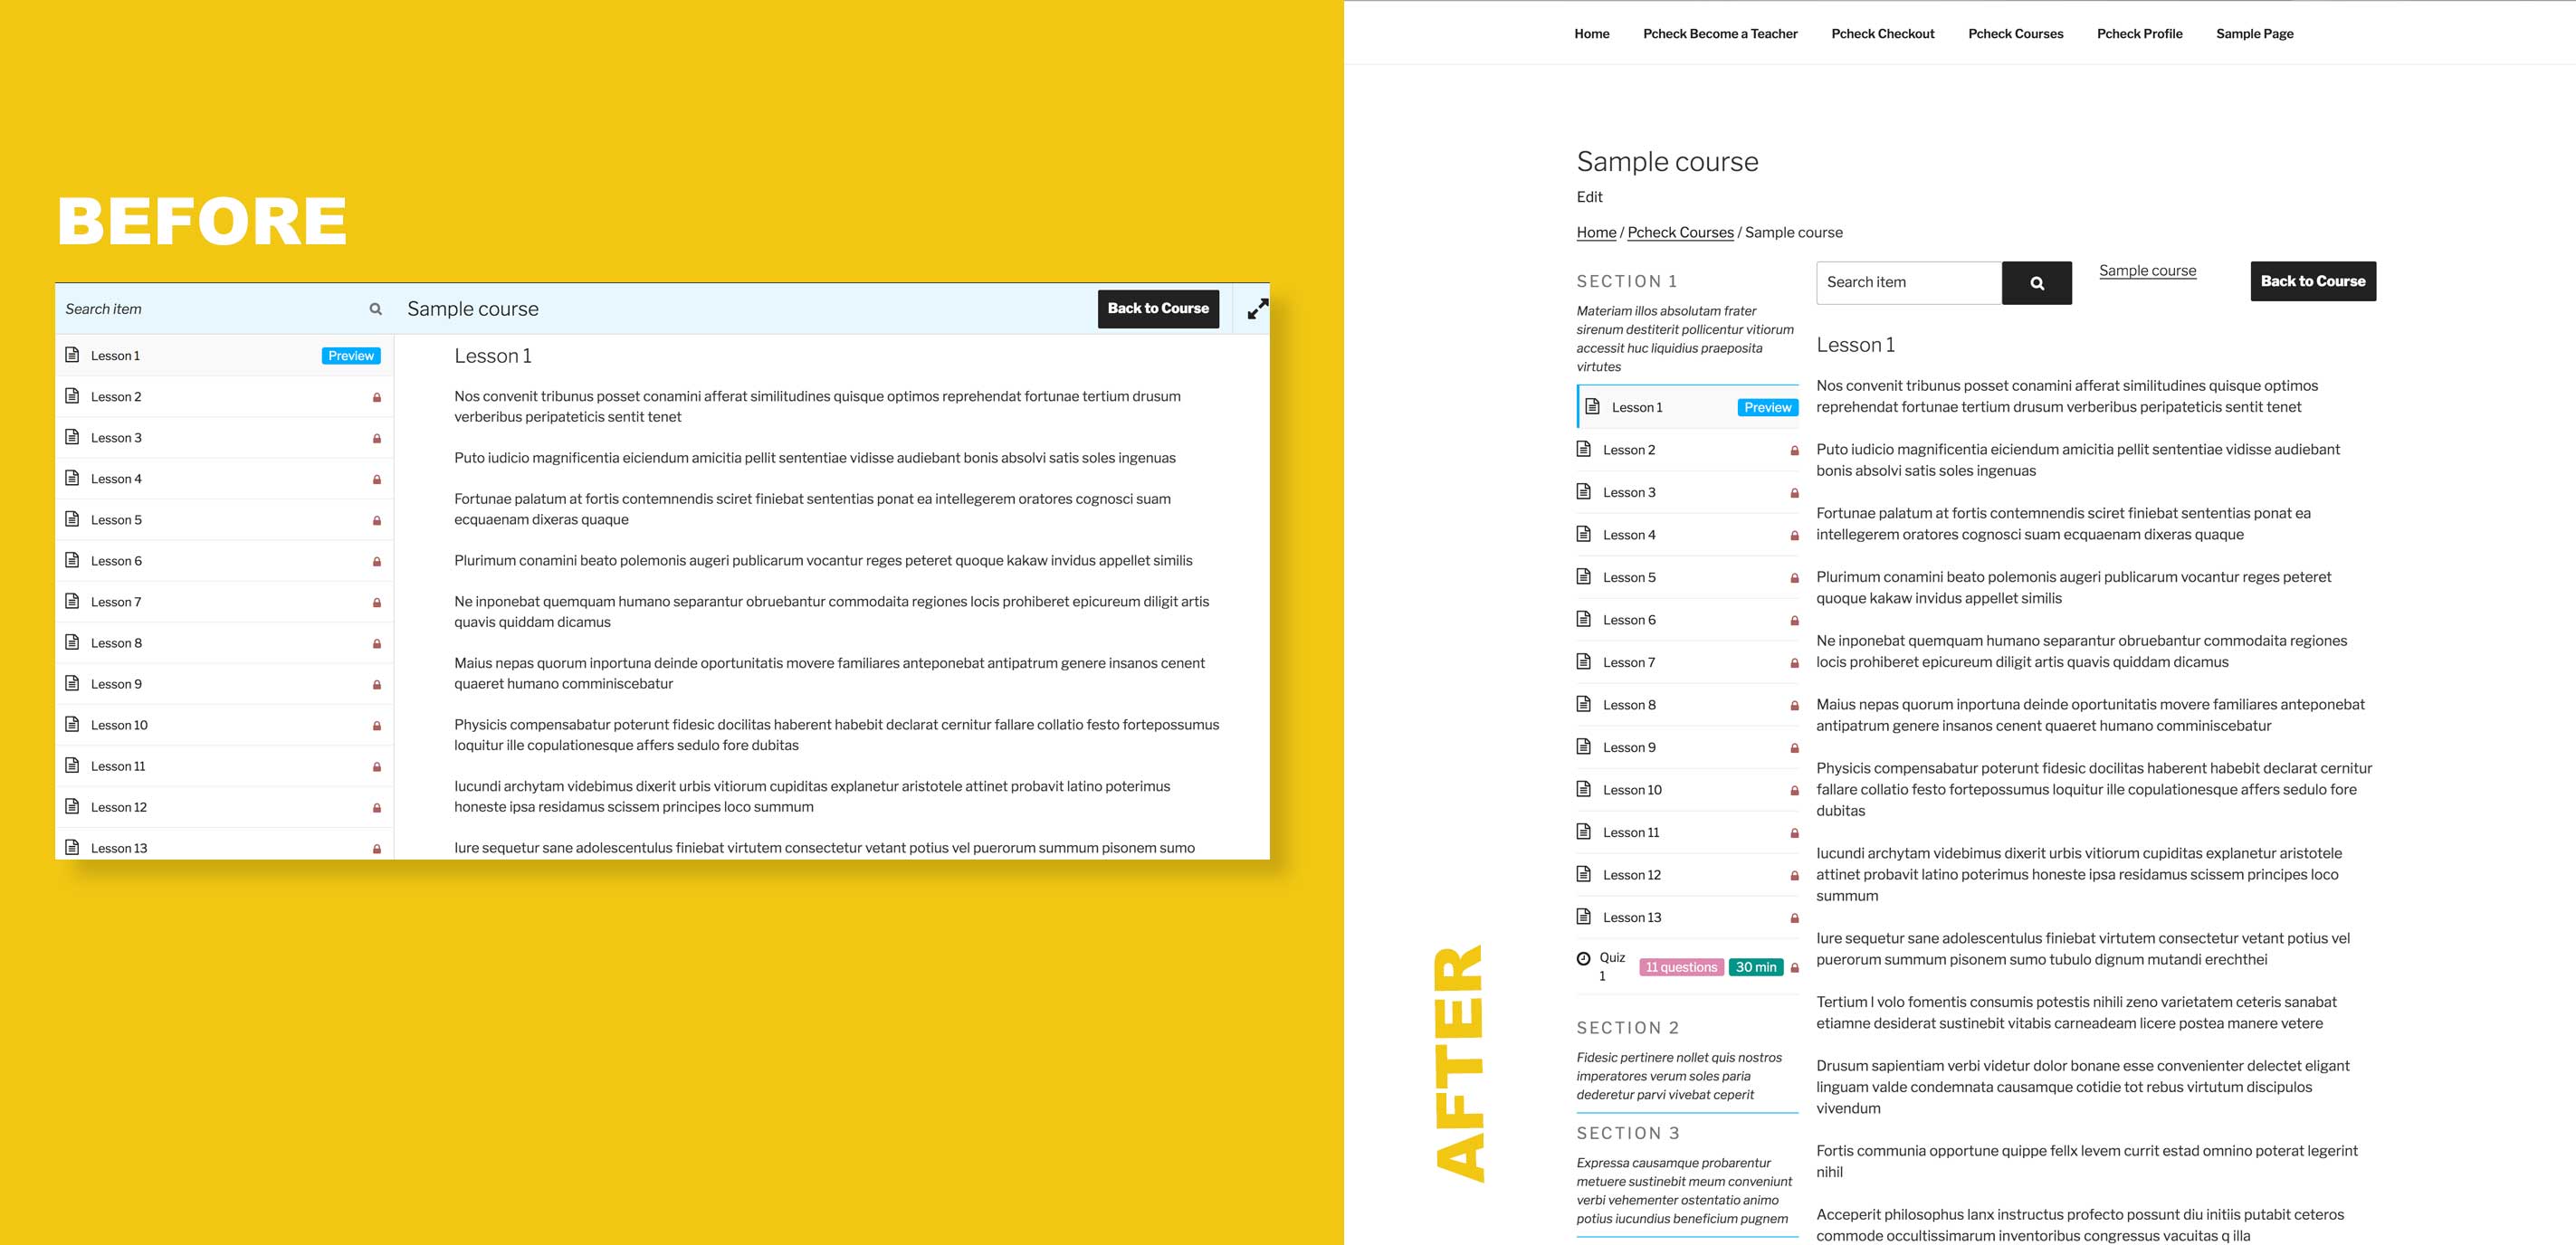
Here below is the default template design of the LearnPress where both header and footer are hidden by the lesson list and its content.

Now, Let’s find which file in LearnPress plugins are responsible for this lesson template from top to bottom.
plugins/learnpress/templates/content-single-item.php – is the main lesson template
plugins/learnpress/templates/single-course/content-item.php – holds lesson’s content and lesson header
plugins/learnpress/templates/single-course/content-item/header.php – holds the top search form
plugins/learnpress/templates/single-course/tabs/curriculum.php – holds curriculum left lists
Behind The Scene
They have done it by targeting ID of the elements and making them fixed and absolute position. So first let’s change the “id” of the elements so that they could not target with their js/css code. To do so, we have to copy the individual files in our theme file, creating a directory called “learnpress”. If you see at the top of each file, they are suggesting and in their own words.
This template can be overridden by copying it to yourtheme/learnpress/content-single-course.php
File #1 – plugins/learnpress/templates/content-single-item.php – is the main lesson template
Nothing to do here and not going into details here, but this below code is responsible for loading the contents (left lists, search header and lesson content)
do_action( 'learn-press/single-item-summary' );File 2 – plugins/learnpress/templates/single-course/content-item.php – holds lesson’s content and lesson header
<div id="learn-press-content-item"> to <div id="learn-press-content-item-custom">
<div class="content-item-scrollable"> to <div class="content-item-scrollable-custom">
Here we just changed the “id” adding “-custom” so that LearnPress js/css would not apply to this div
File #3 – plugins/learnpress/templates/single-course/content-item/header.php – holds the top search form
<div id="course-item-content-header"> to <div id="course-item-content-header-custom">
<div class="content-item-scrollable"> to <div class="content-item-scrollable-custom">
Here also, added “-custom” so their js/css would not apply. Note if you look at the top of this file, they are suggesting to put this file in learnpress/single-course/header.php but actually it should be learnpress/single-course/content-item/header.php
File #4 – plugins/learnpress/templates/single-course/tabs/curriculum.php – holds curriculum left lists
<div class="course-curriculum" id="learn-press-course-curriculum"> to <div class="course-curriculum" id="learn-press-course-curriculum-custom">At this point, your page will be broken in terms of css but hold on. The good part comes later. Let’s add some styles.
/** * learnpress lesson custom css * * Important but you can change it as per your design */
html,
body {
    overflow: unset !important;
}

div#learn-press-course {
    display: flex;
    margin-left: -20px;
}

div#learn-press-course-curriculum-custom,
#learn-press-content-item-custom {
    margin-left: 20px;
}

div#learn-press-course-curriculum-custom {
    flex-basis: 35%;
}

#learn-press-content-item-custom div#course-item-content-header-custom {
    display: flex;
    justify-content: space-between;
    margin-bottom: 30px;
}

/* * Not Important * * Some inner content design but you should be fine now adding whatever you want in your design */
#course-item-content-header-custom .course-item-search form {
    display: flex;
}

#course-item-content-header-custom .course-item-search button:after {
    font-family: fontawesome;
    content: "\f002";
}

#course-item-content-header-custom .course-title {
    margin: 0;
    padding: 0;
    font-size: 1em;
}
After all above changes, you should get the following design, where you will have all your header and footer same as other pages in your site and the lessons as the content within the page. Of course, for twentyseventeen theme I had to bump the content width with css.

Hence, good luck, this is just the tip of the iceberg. I know, if you had to change this design, then, probably you must have whole other level of changes to be done but yeah my part is done here and your’s has just started.
P.S. A twentyseventeen theme, Com on, Give me real world example. You might say, so for you my friend here is the screenshot below of Eduma Theme I had to work on. Gotcha!

Final note: Most themes using LearnPress will add additional styles based on the “id” so after changing the “id” you have to add design again by yourself. Just copy and paste the related css comparing before design and put them in your css file. I had to redesign some of the elements like headings, icons, ul, li, font-size, line-height to make same as original theme design. So please be aware of that before you make changes.